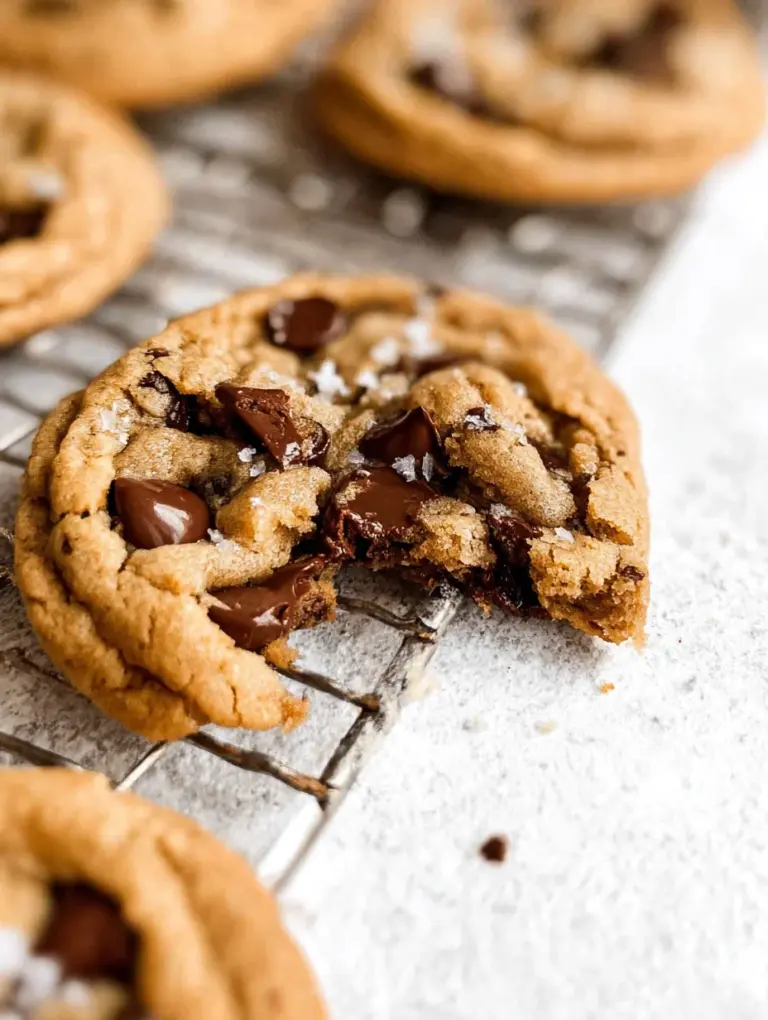
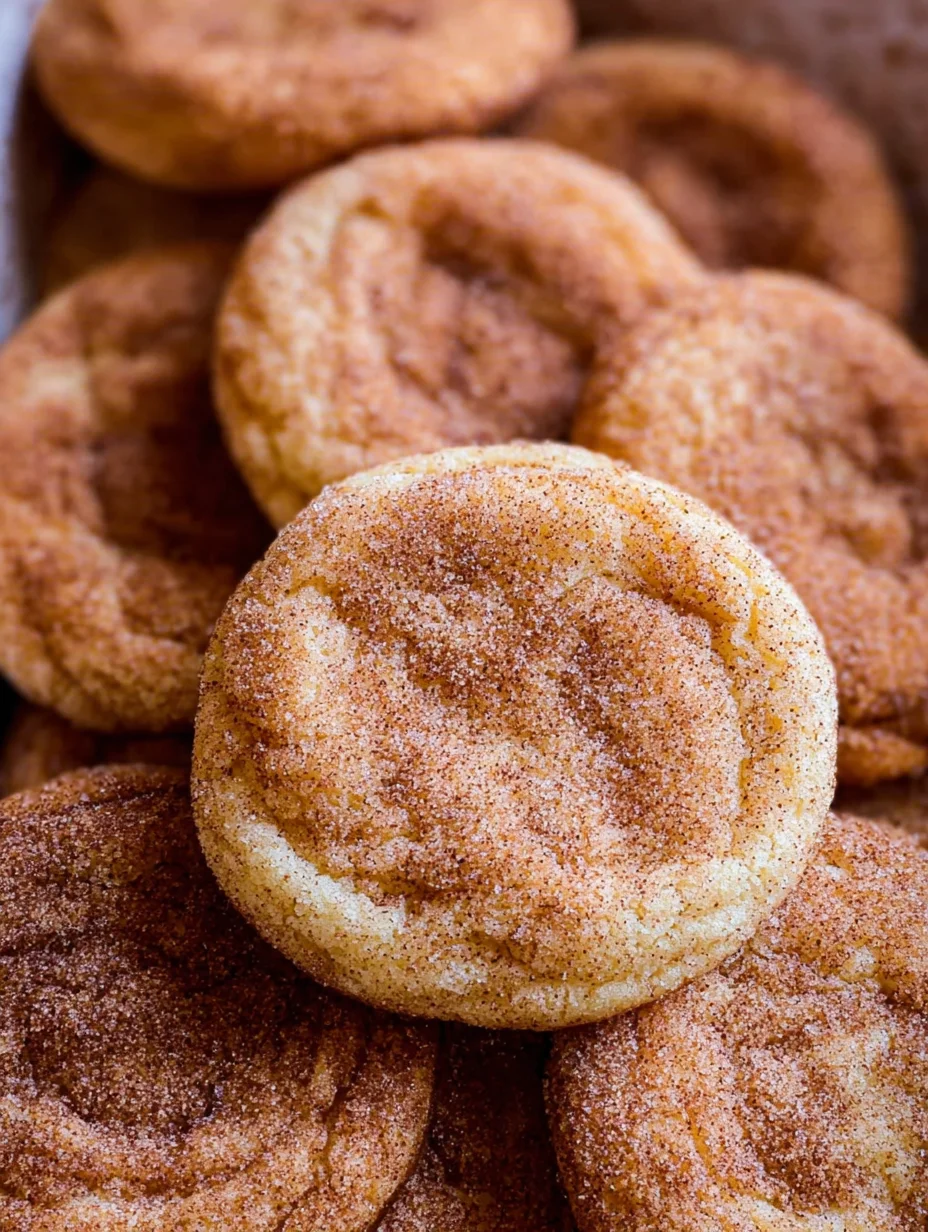
Snickerdoodle Cookies
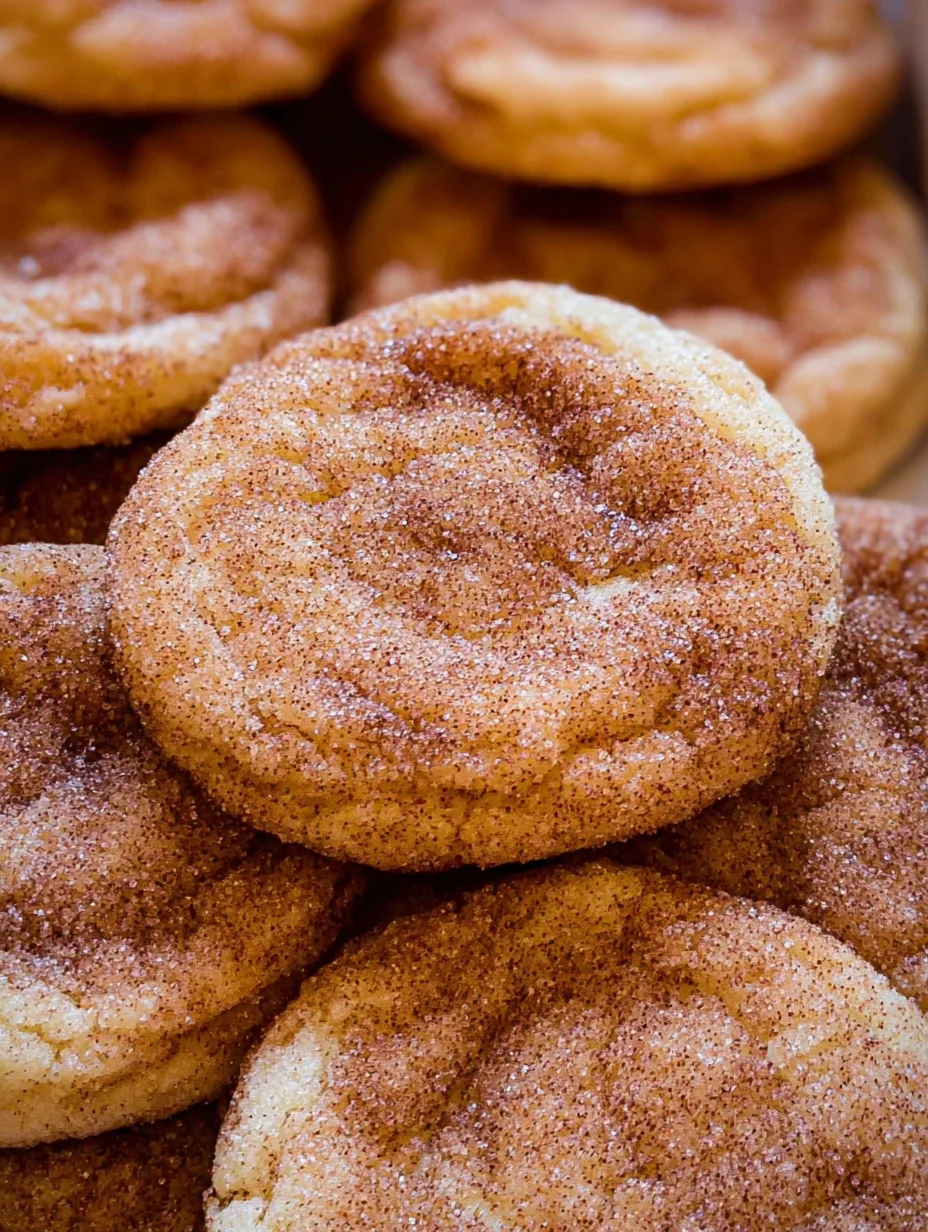
There’s something undeniably magical about the warm, cinnamon-sugar scent of fresh Snickerdoodle Cookies wafting through the kitchen—it instantly transports me back to childhood holidays and cozy family gatherings. As a baking enthusiast who’s whipped up countless batches over the years, I can tell you that Snickerdoodle Cookies aren’t just any cookie; they’re a delightful blend of chewy centers, crisp edges, and that signature tangy twist from cream of tartar. If you’re craving an easy dessert that delivers big on flavor without fuss, these homemade Snickerdoodle Cookies are your new go-to recipe. I’ve perfected this version to ensure every bite is pure comfort, and I’m excited to share it with you so you can create your own sweet memories.
Now, you might be thinking, “Why Snickerdoodle Cookies when chocolate chip is so classic?” Here’s the thing: their unique spiced coating and soft texture make them stand out, especially during fall or winter when that cinnamon aroma feels like a hug. In my experience, these Snickerdoodle Cookies disappear faster than any other treat at potlucks or movie nights. Whether you’re a novice baker or a seasoned pro, this recipe will have you rolling dough and sprinkling sugar in no time.
Let’s dive in—I’ll walk you through everything from ingredients to pro tips, complete with links to other favorites like our Coffee Cake Cookies or Lemon Crinkle Cookies for more inspiration. Get ready to bake up some joy!
Grab This Chef Knife Now - Almost Gone!

- Stays Razor-Sharp: Ice-hardened blade keeps its edge longer than ordinary knives
- Superior Grip Control: Unique finger hole design gives you perfect balance and safety
- Built to Last a Lifetime: Premium stainless steel blade with elegant beech wood handle
- ✓ Finally, a knife that stays sharp and feels comfortable in my hand
- ✓ Professional quality without the premium price tag
- ✓ Makes meal prep faster and more enjoyable
⏰ Only a few items left in stock - order soon
Key Takeaways:
- Snickerdoodle Cookies offer a perfect balance of chewy texture and cinnamon flavor that’s ideal for holiday baking or everyday treats.
- This recipe is quick to prepare, ready in under 30 minutes of active time, making it a convenient choice for busy bakers.
- The tangy cream of tartar gives Snickerdoodle Cookies their signature taste, setting them apart from ordinary sugar cookies.
- Chill the dough for at least 30 minutes to achieve the best soft and crackly appearance on your Snickerdoodle Cookies.
- Store baked Snickerdoodle Cookies in an airtight container for up to a week to keep them fresh and flavorful.
Why You’ll Adore This Snickerdoodle Cookies Recipe
Effortless Baking Joy: These Snickerdoodle Cookies come together with simple pantry staples, so you won’t need to run to the store mid-recipe. I love how the dough mixes up in minutes, leaving you more time to enjoy the process rather than stressing over complicated steps. It’s the kind of recipe that makes baking feel accessible and fun for everyone.
Irresistible Flavor Profile: The combination of buttery sweetness and warm cinnamon coating creates a taste that’s cozy and addictive—we’re talking about cookies that melt in your mouth with every bite. What I find interesting is how the cream of tartar adds a subtle tang that elevates the whole experience. You’ll be hooked after the first batch!
Versatile for Any Occasion: Whether you’re serving Snickerdoodle Cookies at a party or packing them for lunch, they fit right in with their crowd-pleasing appeal. Their golden, crinkly tops make them look as good as they taste, impressing guests without much effort. Plus, they’re naturally egg-free adaptable for dietary tweaks.
Family-Friendly Fun: Involving kids in rolling these Snickerdoodle Cookies in cinnamon sugar turns baking into a memorable activity. The hands-on part is messy but oh-so-rewarding, fostering those little moments of connection in the kitchen. It’s a recipe that builds traditions, one cookie at a time.
Grab This Kitchen Scale Now — Best Precision Pick!

- Razor-Accurate Every Time: Dual-increment precision down to 0.1g — perfect for baking, meal prep, and portion control with g, oz, ml, and fl'oz modes.
- Smart Removable Bowl Design: Detachable bowl doubles as a protective case for compact storage. Tare function lets you weigh ingredients in any container with zero fuss.
- Built for Everyday Convenience: Auto-zero, tare function, low battery alert, overload indicator, and 2-minute auto-off to extend battery life — all in a sleek stainless steel build.
- ✓ "Perfect for baking — precise, lightweight, and stores easily without wasting counter space"
- ✓ "A game changer! Weighing ingredients is now way more accurate than measuring cups"
- ✓ "Love the 0.1g precision and backlight — best food scale I've owned. Highly recommend!"
⏰ Only a few items left in stock - order soon
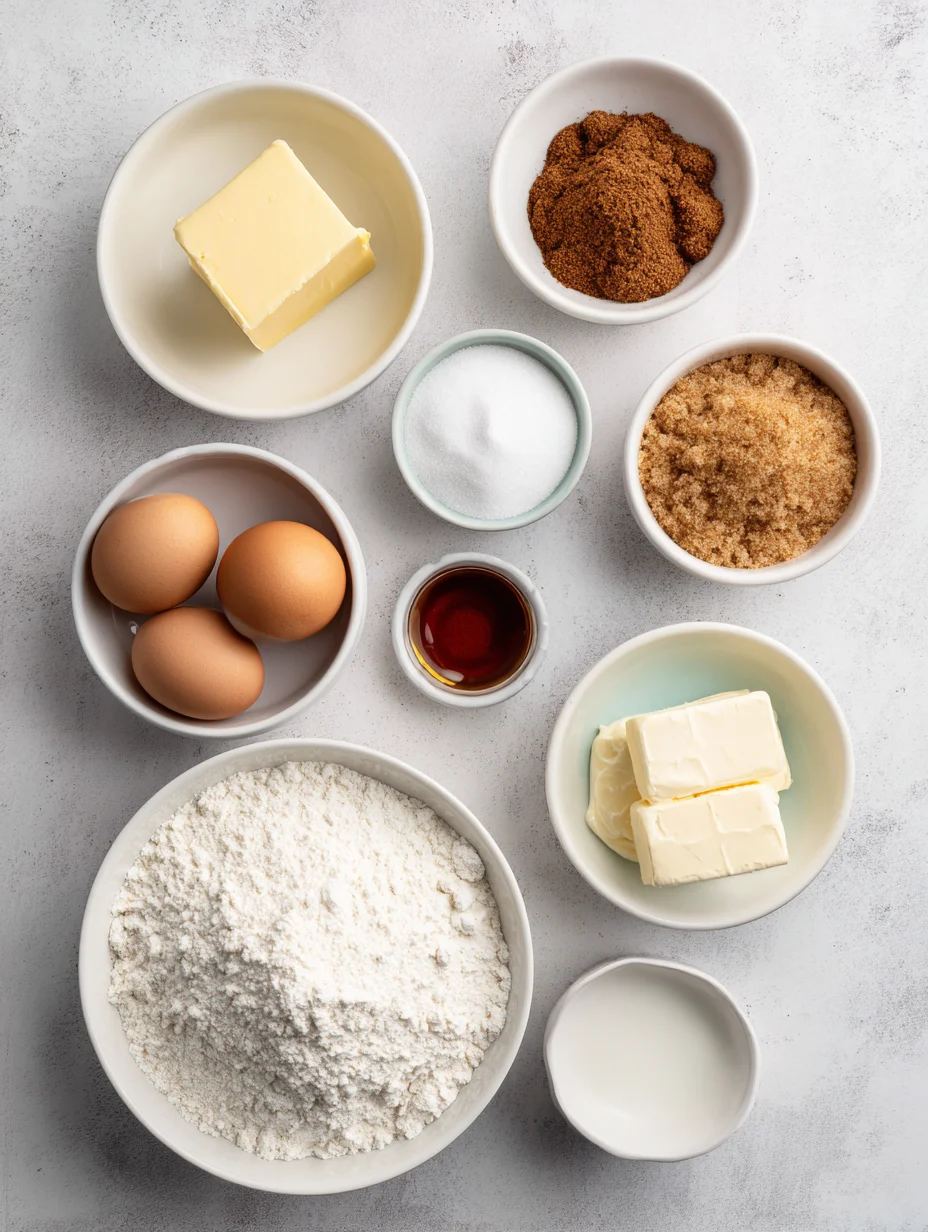
Essential Ingredients for Snickerdoodle Cookies
Unsalted Butter: Starting with room-temperature unsalted butter is key because it creams beautifully with the sugar, creating that light and fluffy base for your cookies. This ingredient provides richness and helps the Snickerdoodle Cookies spread just right in the oven for those perfect edges. I’ve tried salted butter before, but it throws off the balance—stick to unsalted for the best results every time. Without it, your Snickerdoodle Cookies might end up too dense or greasy.
Cream of Tartar: This pantry hero gives Snickerdoodle Cookies their distinctive tangy flavor and helps stabilize the dough for a tender crumb. It’s what sets them apart from basic sugar cookies, reacting with the baking soda to create lift and chewiness. In my experience, don’t skip it; a substitute like lemon juice won’t quite capture the same magic. Measure it carefully to avoid any bitterness in your final bake.
Ground Cinnamon: The star of the coating, ground cinnamon infuses Snickerdoodle Cookies with warm, spicy notes that pair perfectly with the sweetness. It not only flavors the roll but also bakes into a crackly, caramelized shell that’s irresistible. I always use fresh cinnamon for the most vibrant aroma—stale stuff just doesn’t deliver the same punch. For your Snickerdoodle Cookies, this spice ensures every bite is aromatic and comforting.
How to Make Snickerdoodle Cookies
Prepare the Dough
Begin by creaming together the softened butter and granulated sugar in a large bowl until it’s light and fluffy—this usually takes about 2-3 minutes with an electric mixer. Beat in the eggs one at a time, ensuring each is fully incorporated before adding the next, which helps build the structure for your Snickerdoodle Cookies. In a separate bowl, whisk the dry ingredients: flour, cream of tartar, baking soda, and salt. Gradually mix the dry into the wet until a soft dough forms; don’t overmix to keep the texture tender.
Chill and Shape
Wrap the dough in plastic and chill it in the fridge for at least 30 minutes—this step prevents the Snickerdoodle Cookies from spreading too much and helps them hold their shape. While it rests, preheat your oven to 400°F and line baking sheets with parchment paper for easy cleanup. Once chilled, scoop tablespoon-sized portions and roll them into balls, feeling the dough’s cool smoothness under your hands. The chill also intensifies the flavors, making each Snickerdoodle Cookie even more delicious.
Bake to Perfection
Roll each dough ball in the cinnamon-sugar mixture until generously coated, then place them on the sheets about 2 inches apart—the sugar will create that signature crinkly top as they bake. Pop them in the oven for 8-10 minutes; you’ll know they’re ready when the edges are set but the centers look slightly soft for that chewy finish. Let the Snickerdoodle Cookies cool on the sheet for a few minutes before transferring to a wire rack—the residual heat finishes the baking without overdoing it. For extra flair, check out our Espresso Chocolate Chip Cookies for a caffeinated twist on cookie baking.
Ingredients
- 1 cup (2 sticks) unsalted butter, softened
- 1 ½ cups granulated sugar
- 2 large eggs
- 2 ¾ cups all-purpose flour
- 2 teaspoons cream of tartar
- 1 teaspoon baking soda
- ¼ teaspoon salt
- 3 tablespoons granulated sugar (for rolling)
- 1 tablespoon ground cinnamon (for rolling)
Snickerdoodle Cookies Instructions
- Cream butter and 1 ½ cups sugar until light and fluffy. Beat in eggs one at a time.
- Whisk together flour, cream of tartar, baking soda, and salt. Gradually add to wet ingredients to form dough.
- Chill dough for 30 minutes. Preheat oven to 400°F.
- Mix 3 tbsp sugar and 1 tbsp cinnamon. Roll dough balls in mixture.
- Bake 8-10 minutes until edges are set. Cool on sheets before serving.
Pro Tips for the Best Snickerdoodle Cookies
Room Temperature Ingredients: Always use softened butter and eggs at room temp for smoother mixing and better rise in your Snickerdoodle Cookies.
Don’t Overbake: Pull them out when centers are still soft—they’ll firm up as they cool, ensuring that perfect chewy texture.
Measure Flour Correctly: Spoon and level to avoid dense cookies; too much flour can make your Snickerdoodle Cookies tough.
You Must Know
- Snickerdoodle Cookies traditionally use cream of tartar for their unique tang, but it’s essential for authenticity.
- Baking at a high temperature like 400°F creates the crinkly tops that define great Snickerdoodle Cookies.
- These cookies are naturally egg-based but can be adapted for vegan versions with simple swaps.
- The dough benefits from chilling to prevent spreading and enhance flavor development.
How to Store Snickerdoodle Cookies
To keep your Snickerdoodle Cookies fresh, store them in an airtight container at room temperature for up to five days—they stay soft thanks to the butter content. For longer storage, freeze baked cookies in a single layer before transferring to a bag; they’ll last up to three months and thaw quickly. If you prefer them warm, a quick microwave zap for 10 seconds revives that just-baked feel without sogginess. Avoid the fridge unless it’s humid, as it can dry them out faster.
Customizing Your Snickerdoodle Cookies
Want to tweak this recipe? Swap half the flour for whole wheat for a nuttier bite, or add a teaspoon of vanilla extract for extra depth in your Snickerdoodle Cookies. For a fun variation, mix in white chocolate chips or chopped pecans before baking—I’ve done this for holidays and it always gets rave reviews. If you’re gluten-free, use a 1:1 baking blend and ensure your cream of tartar is certified. Check out our Lemon Blueberry Cookies for citrus-inspired custom ideas that pair well.
What to Serve with Snickerdoodle Cookies
Pair these warm Snickerdoodle Cookies with a scoop of vanilla ice cream for an indulgent dessert sundae that melts beautifully. For a cozy afternoon snack, enjoy them alongside a steaming cup of coffee or hot chocolate—the cinnamon notes complement the richness perfectly. If you’re hosting, serve with fresh fruit like apple slices or a cheese board for a sweet-savory contrast that surprises guests. Don’t forget a tall glass of milk to cut through the sweetness and enhance every bite.
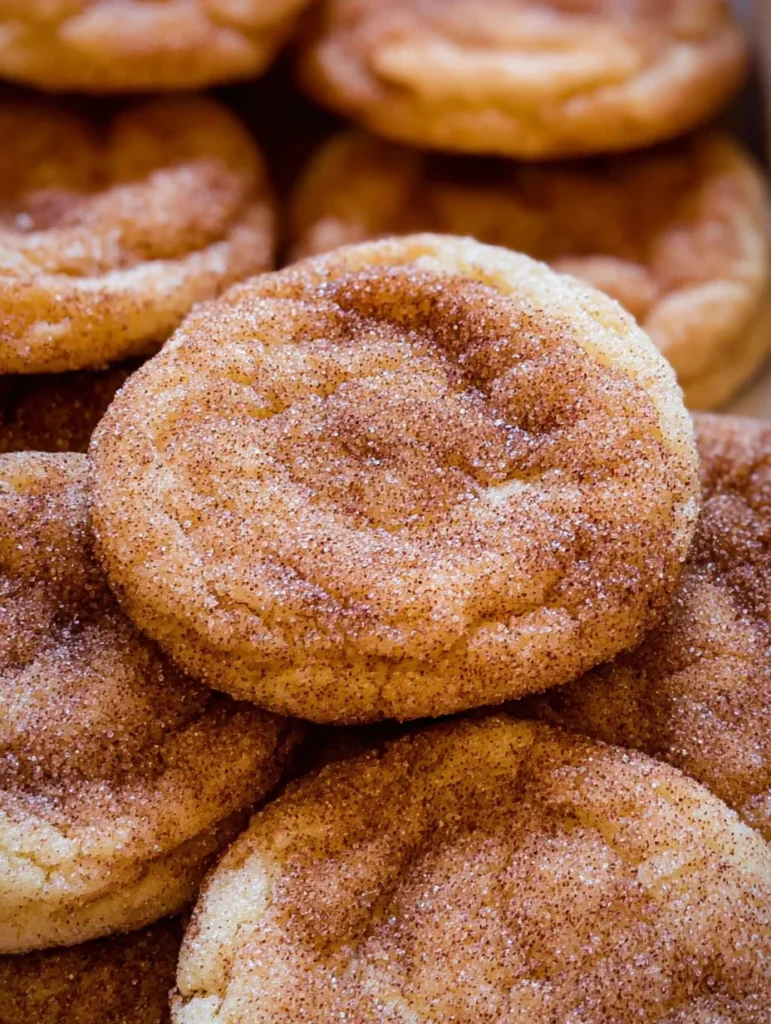
Snickerdoodle Cookies
My favorite easy recipe gives you the BEST soft and chewy Snickerdoodles that are bursting with flavor from a double dip in cinnamon sugar. I'll give you all my tips to make sure your cookies don't turn out dry and crumbly!
Timing
Recipe Details
Ingredients
- 01 1 cup salted butter (2 sticks, softened)
- 02 1 1/3 cup granulated sugar
- 03 1/3 cup brown sugar (packed)
- 04 2 large eggs
- 05 2 teaspoons vanilla extract
- 06 3 1/4 cups all-purpose flour (spooned and leveled)
- 07 1 teaspoon baking soda
- 08 3/4 teaspoon kosher salt
- 09 1 1/2 teaspoons cream of tartar
- 10 1/3 cup granulated sugar
- 11 1 1/2 tablespoons cinnamon
Instructions
Preheat the oven to 350 degrees and prepare a few baking sheets with parchment paper, or line with a silicone mat.
Make the dough. In a large bowl or stand mixer, beat 1 cup butter for a couple minutes until smooth, scraping the sides and bottom a few times in between.
Add 1 and 1/3 cup white sugar and 1/3 cup packed brown sugar. Beat for 2 minutes, taking the time to scrape the bottom and sides of the bowl in between. Your butter and sugar should be light and fluffy with no chunks at all.
Add 2 eggs and 2 teaspoons vanilla. Beat well, scraping the sides and bottom of the bowl. Make sure you beat it long enough that it becomes smooth and homogenous.
Add 3 and 1/4 cups flour (be sure to spoon it into the measuring cup! Don't dip your cup into the flour bin, you will pack your flour and end up with too much!) Don't mix the flour in yet.
Use a small spoon (I use my teaspoon) to stir 1 teaspoon baking soda, 3/4 teaspoon kosher salt, and 1 and 1/2 teaspoons cream of tartar into the flour. Gently beat the flour mixture into the butter mixture. Don't overdo it. There should still be flour streaks when you stop your mixer. Use a spatula to scrape down the edges of the bowl.
Continue beating just a few more seconds until all the flour streaks are gone. Do not over mix! You want to make sure all the ingredients are combined, but once that is done, stop mixing. Over mixing dough = tough cookies.
Use a large cookie scoop or a spoon to shape the dough. You want dough balls that are about 1 and 1/2 to 2 inches across. I used this cookie scoop.
Roll the cookies. In a small or medium bowl, add 1/3 cup sugar and 1 and 1/2 tablespoons cinnamon. Stir together. Roll the shaped cookies in the cinnamon-sugar to coat. (Reserve the remaining cinnamon-sugar!)
Place cookie dough balls on the prepared baking sheet with about 2 inches in between them. I can fit 12 cookies on an 11x17 baking sheet.
Bake the cookies at 350 for about 9-11 minutes, until the edges are barely set. It's ok if the centers of the cookies (about the size of a quarter) are still shiny. The rest of the cookie should be matte. It's VERY important to not over bake snickerdoodles; underbaking slightly is what helps give them that soft and chewy texture. (Dry Snickerdoodles taste like chalk. Don't be like that.)
Shape the cookies. Immediately after taking the cookies out of the oven, use a spoon to push the edges of the cookies toward their centers. This makes the cookies round in shape and makes the center thicker and more chewy. You have to do this within 30-60 seconds of taking them out of the oven, before the edges harden. Enlist help if you can! See my Chewy Chocolate Chip Cookies recipe for more details about this technique!
Let the cookies set up on the pan for at least 3-5 minutes. Remove the cookies to a wire cooling rack and let cool for a few minutes.
While the cookies are still warm, but cool enough to handle (and not falling apart), place each cookie back into the bowl of cinnamon sugar*. Coat one side of the cookie, then flip it over and coat the other side. This gives you the ultimate cinnamon-sugar edge to your snickerdoodle! Enjoy one right away with a glass of milk!
Freezer instructions: You can freeze this dough and bake later! I like to shape the dough into balls, roll them in cinnamon sugar, and store them in a ziplock bag. They will keep in the freezer for up to 3 months. I never thaw cookie dough before baking. Just bake straight from frozen and add a couple minutes to the bake time. Voila!
FILED UNDER:
NUTRITION FACTS (PER SERVING)
Nutrition information is calculated using an ingredient database and should be considered an estimate. In cases where multiple ingredient alternatives are given, the first listed is calculated for nutrition. Garnishes and optional ingredients are not included.
Must-Know Tips
Professional Secrets
Frequently Asked Questions About Snickerdoodle Cookies
Can I make Snickerdoodle Cookies ahead of time?
Absolutely, you can prepare the dough up to two days in advance and chill it in the fridge for even better flavor. Just portion and roll in cinnamon sugar right before baking to keep them fresh. This make-ahead approach is great for holiday prep without losing any of that signature chew.
How long does Snickerdoodle Cookies last in the fridge?
Stored in an airtight container, Snickerdoodle Cookies will stay soft in the fridge for about a week, though room temperature is ideal for the first few days. If they firm up, a quick warm-up in the oven restores their texture. Freezing extends their life further if needed.
Are Snickerdoodle Cookies gluten-free?
Traditional Snickerdoodle Cookies aren’t gluten-free due to the all-purpose flour, but you can easily swap in a certified gluten-free blend. Test a small batch first, as results may vary slightly in texture. For more gluten-free options, explore our site for adapted recipes.
What’s the origin of Snickerdoodle Cookies?
Snickerdoodle Cookies trace back to early American baking, likely German or Dutch settlers, with “snickerdoodle” being a fun, nonsensical name for a cinnamon-sugar treat. The cream of tartar addition became popular in the 19th century for its leavening power. Today, your homemade Snickerdoodle Cookies continue that timeless tradition with a personal touch.
Can I freeze Snickerdoodle Cookies dough?
Yes, freeze scooped dough balls on a tray, then transfer to a bag for up to three months—bake straight from frozen, adding a couple extra minutes. This method ensures fresh-tasting Snickerdoodle Cookies anytime. Thaw if you prefer, but frozen works great for portion control.
How do I get the crinkly tops on Snickerdoodle Cookies?
The crinkly tops come from baking at a high temperature and rolling in sugar, which caramelizes as the Snickerdoodle Cookies puff and settle. Chilling the dough prevents over-spreading, enhancing the effect. If yours don’t crackle, check your oven temp accuracy.
Why are my Snickerdoodle Cookies flat?
Flat Snickerdoodle Cookies often result from warm dough or incorrect measurements—always chill and measure flour by spooning, not scooping. Butter that’s too soft can also cause spreading, so aim for cool room temp. Adjust next time for those perfect domes.
Can I add mix-ins to Snickerdoodle Cookies?
Sure, fold in raisins, nuts, or even chocolate chips for variety, but keep additions light to maintain the classic texture. About ½ cup works well without overwhelming the dough. Experiment to find your favorite twist on these beloved Snickerdoodle Cookies.
Final Thoughts
From the first roll in cinnamon sugar to the last warm bite, these Snickerdoodle Cookies embody everything I love about baking: simplicity, joy, and that unbeatable homemade taste. Whether you’re sharing them with loved ones or savoring one solo with a book, they never fail to brighten the day. Give this recipe a try this weekend—I promise it’ll become a staple in your kitchen rotation. What’s your favorite way to enjoy Snickerdoodle Cookies? Drop a comment below and happy baking!