Cookies and Cream Dessert Cups
Have you ever craved that perfect blend of crunchy cookies and silky cream that just melts in your mouth? That’s exactly what these Cookies and Cream Dessert Cups deliver every single time. I remember the first time I whipped up a batch for a family gathering—everyone was hooked after the first bite, and they disappeared faster than I could say “Oreo heaven.” In my experience, these little treats are a game-changer for anyone who loves no-fuss desserts that look impressive without much effort. Today, I’m sharing my go-to recipe for Cookies and Cream Dessert Cups, so you can create your own moments of pure indulgence.
Here’s the thing: these Cookies and Cream Dessert Cups aren’t just any dessert; they’re layers of crushed chocolate cookies, velvety cream filling, and a touch of whimsy that makes them ideal for parties or a cozy night in. I’ve tweaked this recipe over the years to get that ideal balance of textures—crisp on the bottom, creamy in the middle, and maybe even a sprinkle of cookie crumbles on top for extra fun. Let’s be honest, who can resist the classic cookies and cream combo? Get ready to impress yourself and your loved ones with this easy, delicious treat.
Key Takeaways:
- These Cookies and Cream Dessert Cups are a no-bake delight, perfect for quick prep without heating up the kitchen.
- Ready in under 30 minutes, they’re a time-saving option for busy bakers like you.
- The irresistible mix of crunchy Oreo bits and smooth whipped cream creates a flavor explosion in every cup.
- For the best results, chill your Cookies and Cream Dessert Cups for at least an hour to let the flavors meld.
- Store leftovers in the fridge for up to 3 days—easy snacking whenever the craving hits.
Why You’ll Adore This Cookies and Cream Dessert Cups
Effortless Elegance: These Cookies and Cream Dessert Cups come together with minimal ingredients and no oven required, making them a breeze for weeknight treats or last-minute gatherings. I love how they look so fancy in clear cups, but the assembly is as simple as layering and chilling. You’ll feel like a pro pastry chef without the hassle.
Grab This Chef Knife Now - Almost Gone!

- Stays Razor-Sharp: Ice-hardened blade keeps its edge longer than ordinary knives
- Superior Grip Control: Unique finger hole design gives you perfect balance and safety
- Built to Last a Lifetime: Premium stainless steel blade with elegant beech wood handle
- ✓ Finally, a knife that stays sharp and feels comfortable in my hand
- ✓ Professional quality without the premium price tag
- ✓ Makes meal prep faster and more enjoyable
⏰ Only a few items left in stock - order soon
Ultimate Comfort Food: There’s something so nostalgic about the cookies and cream flavor—it’s like a hug in dessert form. What I find interesting is how the crunch contrasts with the creaminess, keeping every bite exciting. Trust me, once you try these, they’ll become your go-to for feel-good moments.
Versatile for Any Occasion: Whether it’s a birthday bash or a casual coffee date, these Cookies and Cream Dessert Cups fit right in. You can scale the recipe up or down easily, and they’re always a crowd-pleaser. In my experience, kids and adults alike rave about them.
Healthier Twists Possible: While indulgent, you can lighten them up with low-fat cream or homemade cookie alternatives. They’re customizable, so you control the sweetness. Now, you might be thinking they’re too rich, but honestly, the portions are just right for savoring.
Essential Ingredients for Cookies and Cream Dessert Cups
Oreo Cookies: The star of these Cookies and Cream Dessert Cups, Oreos provide that signature crunch and chocolatey depth we all crave. Crushed into a base and sprinkled on top, they add texture that elevates the whole dessert. I always use the classic variety for authenticity, but feel free to experiment with flavored ones if you’re feeling adventurous. Without them, the recipe just wouldn’t be the same.
Grab This Kitchen Scale Now — Best Precision Pick!

- Razor-Accurate Every Time: Dual-increment precision down to 0.1g — perfect for baking, meal prep, and portion control with g, oz, ml, and fl'oz modes.
- Smart Removable Bowl Design: Detachable bowl doubles as a protective case for compact storage. Tare function lets you weigh ingredients in any container with zero fuss.
- Built for Everyday Convenience: Auto-zero, tare function, low battery alert, overload indicator, and 2-minute auto-off to extend battery life — all in a sleek stainless steel build.
- ✓ "Perfect for baking — precise, lightweight, and stores easily without wasting counter space"
- ✓ "A game changer! Weighing ingredients is now way more accurate than measuring cups"
- ✓ "Love the 0.1g precision and backlight — best food scale I've owned. Highly recommend!"
⏰ Only a few items left in stock - order soon
Cream Cheese: This brings a tangy richness to the filling, balancing the sweetness of the cookies perfectly. Softened to room temperature, it mixes smoothly with sugar and cream for that luscious layer in your Cookies and Cream Dessert Cups. In my kitchen, full-fat cream cheese yields the creamiest results, but light versions work too for a guilt-free option. It’s essential for that cheesecake-like vibe.
Heavy Whipping Cream: Whipped to stiff peaks, it creates airy lightness that makes every spoonful of these Cookies and Cream Dessert Cups dreamy. The key is chilling your bowl beforehand for faster whipping and better volume. I’ve found that adding a touch of vanilla extract enhances the flavor without overpowering. This ingredient ties everything together beautifully.
How to Make Cookies and Cream Dessert Cups
Prepare the Cookie Base
Start by crushing about 20 Oreo cookies into fine crumbs using a food processor or a zip-top bag and rolling pin—it’s a great stress reliever, too. Mix in a bit of melted butter to help it hold together, creating that perfect crumbly foundation for your Cookies and Cream Dessert Cups. Spoon a couple of tablespoons into the bottom of each serving cup and press down gently for stability. This layer sets the stage for all the creamy goodness to come, and I promise it takes just minutes.
Whip Up the Cream Filling
In a large bowl, beat softened cream cheese with powdered sugar and vanilla until smooth and fluffy—about 2 minutes with an electric mixer does the trick. Fold in whipped heavy cream gradually to keep it light and airy, avoiding any lumps for a velvety texture. Taste and adjust sweetness if needed; in my experience, this step is where the magic happens, turning simple ingredients into something irresistible. Spoon the mixture over the cookie base, filling each cup about three-quarters full.
Assemble and Chill
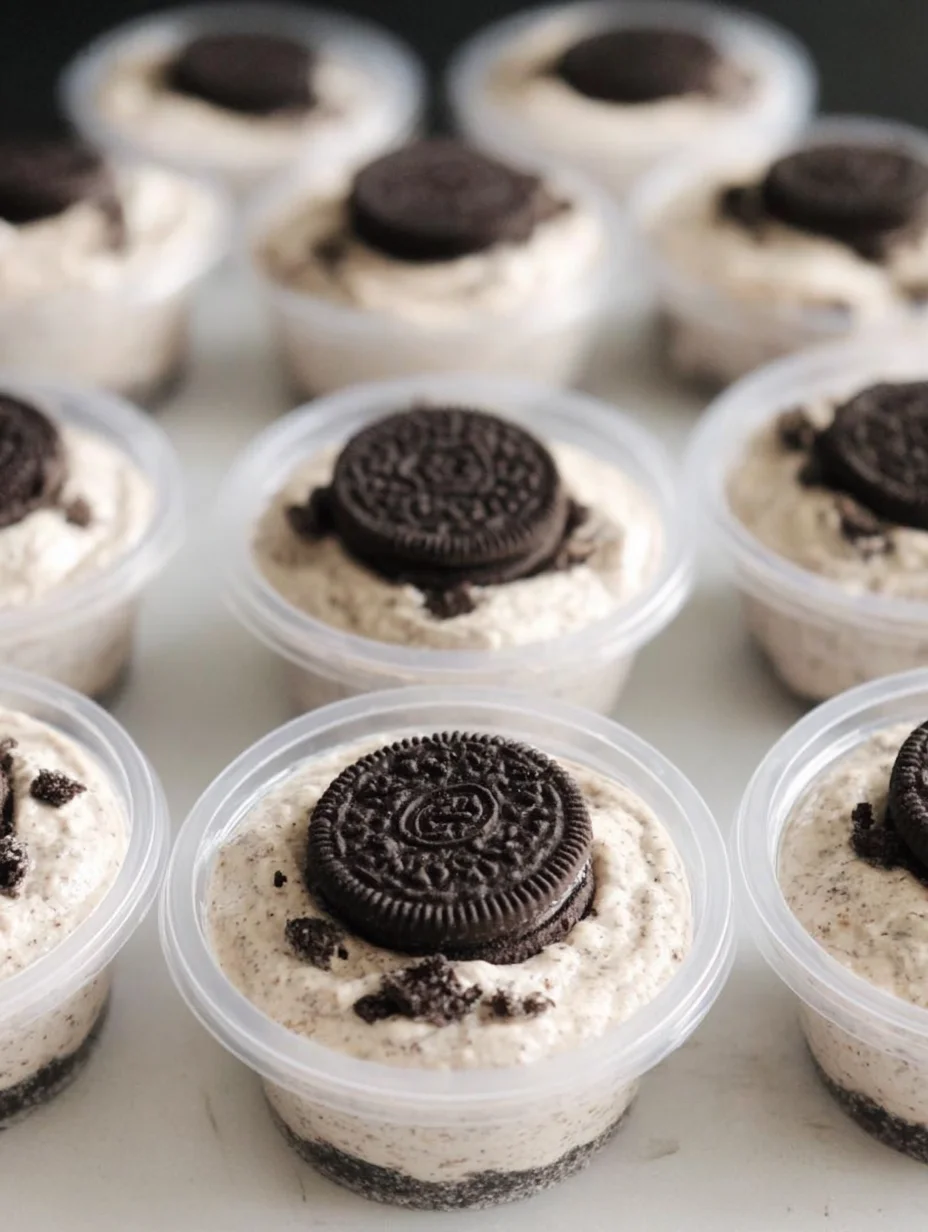
Top your Cookies and Cream Dessert Cups with extra crushed Oreos for that classic look and a sprinkle of chocolate shavings if you want to get fancy. Cover the cups with plastic wrap and refrigerate for at least 1 hour to let the flavors meld and the filling set firm. The chilling not only enhances the taste but also makes them easier to serve without mess. Once ready, they’ll be cool, creamy, and utterly addictive.
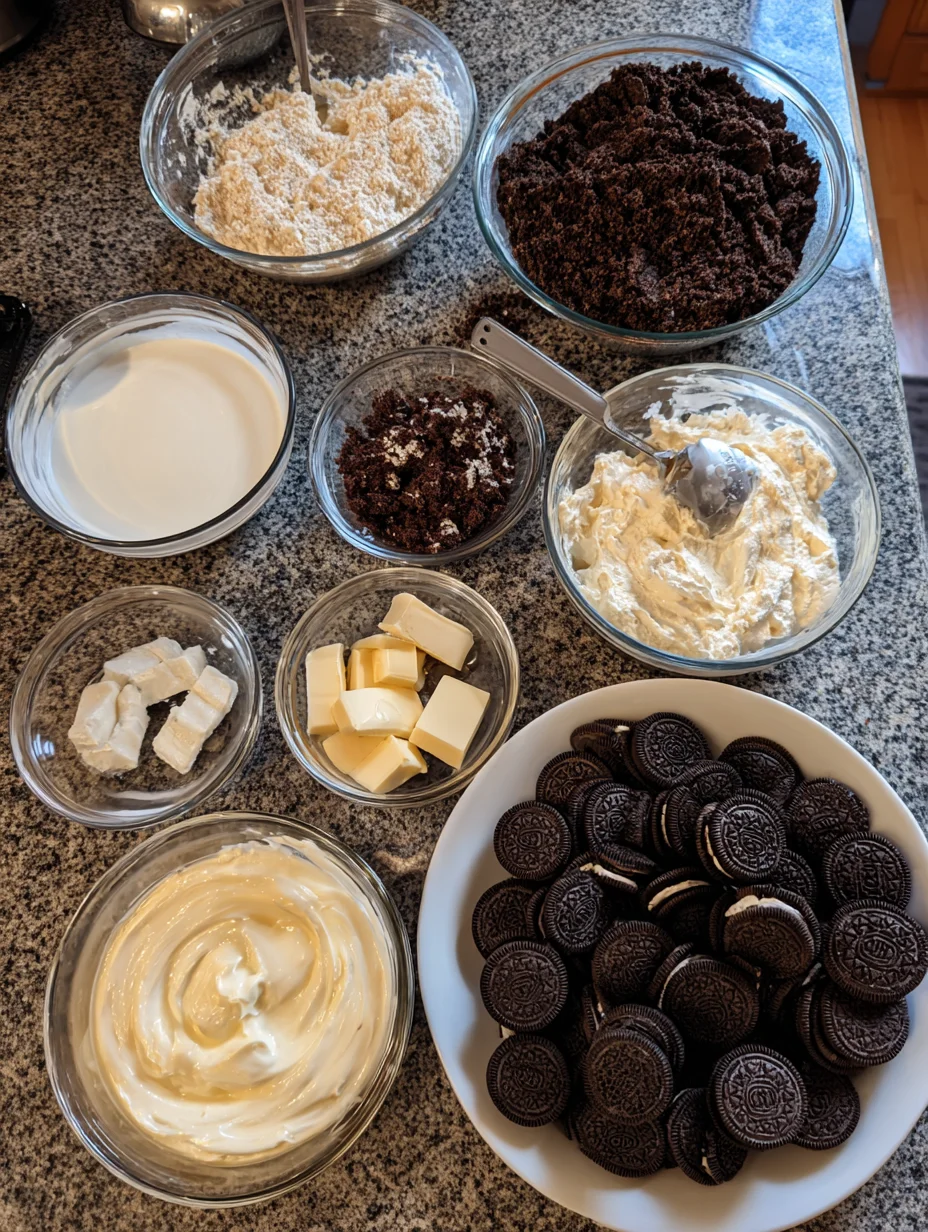
Ingredients
- 20 Oreo cookies, divided
- 2 tablespoons unsalted butter, melted
- 8 oz cream cheese, softened
- 1/2 cup powdered sugar
- 1 teaspoon vanilla extract
- 1 1/2 cups heavy whipping cream, chilled
- Extra Oreo crumbs and chocolate shavings for topping (optional)
Serves: 6-8 cups | Prep Time: 20 minutes | Chill Time: 1 hour
Cookies and Cream Dessert Cups Instructions
- Crush 12 Oreo cookies into fine crumbs. Mix with melted butter until it resembles wet sand.
- Divide the crumb mixture evenly into 6-8 small dessert cups or glasses, pressing down to form a base. Set aside.
- In a mixing bowl, beat cream cheese, powdered sugar, and vanilla until smooth.
- In a separate chilled bowl, whip the heavy cream to stiff peaks. Gently fold into the cream cheese mixture.
- Spoon the filling over the cookie bases, filling each cup nearly to the top.
- Crush remaining Oreos and sprinkle over the tops. Add chocolate shavings if desired.
- Chill in the refrigerator for at least 1 hour before serving.
Pro Tips for the Best Cookies and Cream Dessert Cups
Room Temperature Magic: Always soften your cream cheese fully to avoid lumps in the filling—pop it out of the fridge 30 minutes early.
Chill Your Tools: Keep your mixing bowl and beaters in the freezer for 10 minutes before whipping cream; it helps achieve higher peaks faster.
Portion Control: Use clear glasses to showcase the layers—they make your Cookies and Cream Dessert Cups look even more tempting.
You Must Know
- These Cookies and Cream Dessert Cups are best enjoyed cold, straight from the fridge for maximum creaminess.
- No baking involved, but chilling is crucial to set the filling properly.
- Gluten-free Oreos make this recipe adaptable for dietary needs.
- Each cup is around 300 calories, depending on portion size—indulge mindfully.
How to Store Cookies and Cream Dessert Cups
To keep your Cookies and Cream Dessert Cups fresh, cover them tightly with plastic wrap or lids and store in the refrigerator for up to 3 days. If you need to freeze them, wrap individual cups in foil and they’ll last up to a month, though the texture might soften slightly upon thawing. For serving, let them sit at room temp for 5-10 minutes to take the chill off without melting.
Customizing Your Cookies and Cream Dessert Cups
Swap regular Oreos for mint or peanut butter varieties to switch up the flavor profile in your Cookies and Cream Dessert Cups without much extra work. If you’re watching sugar, try a sugar-free pudding mix in the filling for a lighter version. For a fruity twist, layer in some fresh berries—I’ve done this and it pairs surprisingly well. Check out our Oreo cheesecake bites recipe for more inspiration on variations.
What to Serve with Cookies and Cream Dessert Cups
These Cookies and Cream Dessert Cups shine after a light meal, like grilled chicken salad or veggie stir-fry, to balance the richness. Pair them with hot coffee or tea for an afternoon pick-me-up—the warmth contrasts beautifully with the cool cream. For parties, set them out with fresh fruit skewers or a cheese board to offer variety. In my experience, a scoop of vanilla ice cream on the side turns them into an over-the-top treat.

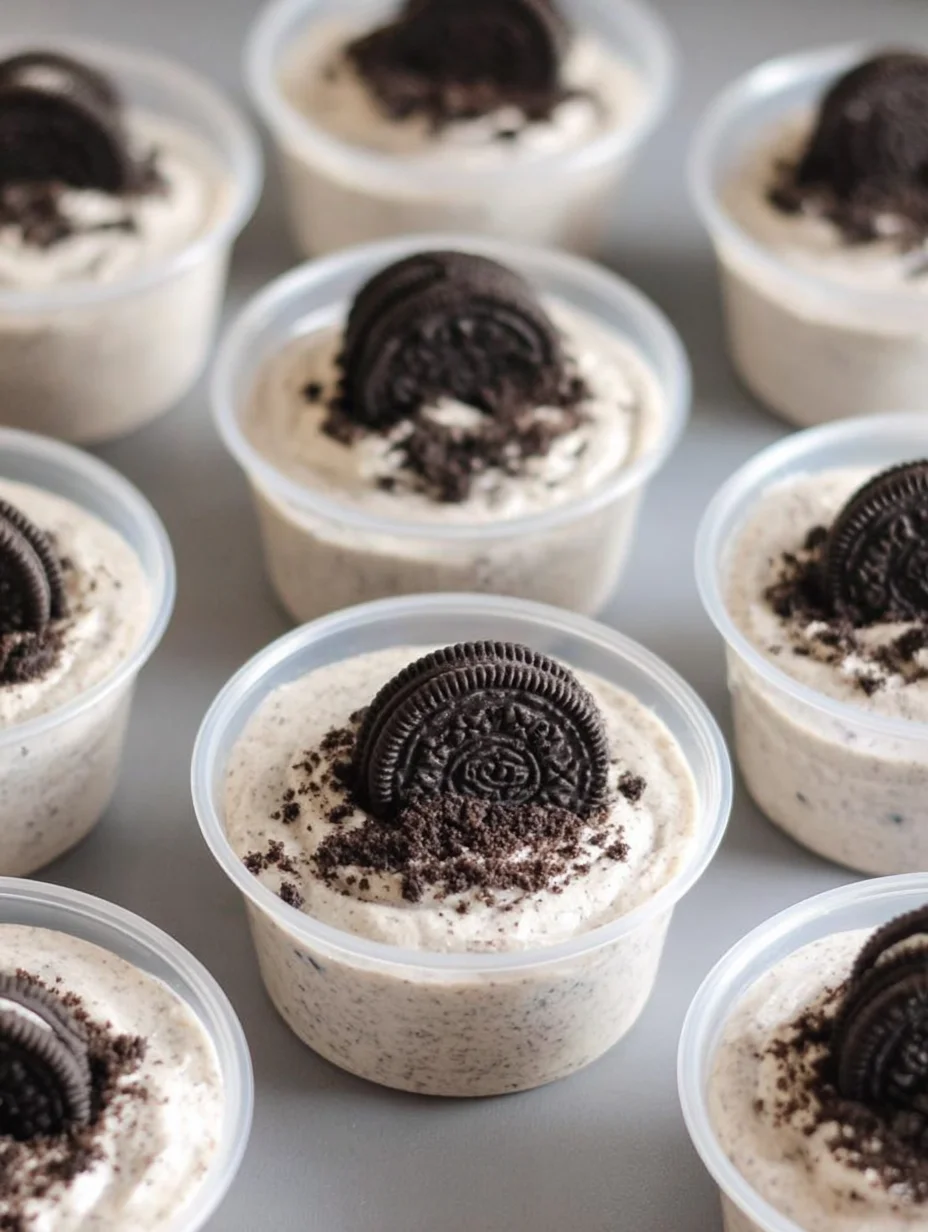
Cookies and Cream Dessert Cups
These no bake dessert cups have an Oreo cookie crust and creamy cookies and cream filling.
Timing
Recipe Details
Ingredients
- 01 2 cups crushed chocolate sandwich cookies
- 02 ¼ cup butter ((melted))
- 03 8 oz cream cheese ((room temperature))
- 04 ¾ cup granulated sugar
- 05 2 tsp vanilla extract
- 06 1 ½ cups heavy cream
- 07 ½ cup crushed chocolate sandwich cookies
- 08 28 mini chocolate sandwich cookies
Instructions
In a small bowl, combine 2 cups chocolate sandwich cookie crumbs and melted butter.
Portion the crumbs into 28 2-ounce plastic cups using a small cookie scoop or spoon. Use one of the plastic cups to press the crumbs into the bottom of the cup.
In another mixing bowl, combine room temperature cream cheese and granulated sugar. Cream together with an electric hand mixer on medium speed until combined and smooth.
Add in heavy cream and vanilla extract. Whip on medium-high speed until light and fluffy.
Fold in ½ cup chocolate sandwich cookie crumbs.
Fill a piping bag with the cookies and cream mixture. Pipe the mixture into the cups until about 3/4 full.
Top each dessert cup with a mini chocolate sandwich cookie or additional cookie crumbs.
Seal the cups with a lid and chill. The cups can be served immediately or stored in the refrigerator for 2-3 days.
FILED UNDER:
NUTRITION FACTS (PER SERVING)
Nutrition information is calculated using an ingredient database and should be considered an estimate. In cases where multiple ingredient alternatives are given, the first listed is calculated for nutrition. Garnishes and optional ingredients are not included.
Frequently Asked Questions About Cookies and Cream Dessert Cups
Can I make Cookies and Cream Dessert Cups ahead of time?
Absolutely, these Cookies and Cream Dessert Cups are perfect for prepping in advance. Assemble them up to 24 hours ahead and chill covered in the fridge. The flavors even intensify a bit, making them taste even better.
How long does Cookies and Cream Dessert Cups last in the fridge?
Your Cookies and Cream Dessert Cups will stay fresh for 3-4 days when stored properly in an airtight container. Beyond that, the cream might start to weep a little, but they’re still safe to eat. Just give them a quick freshness check before enjoying.
Are Cookies and Cream Dessert Cups gluten-free?
They can be, if you use gluten-free Oreos or chocolate sandwich cookies. The rest of the ingredients are naturally gluten-free, so it’s an easy swap for dietary needs.
Can I use Cool Whip instead of heavy cream?
Yes, Cool Whip works great in these Cookies and Cream Dessert Cups for a shortcut—fold it directly into the cream cheese mixture. It saves time on whipping, though fresh cream gives a richer taste.
What’s the best way to crush the cookies?
A food processor is quickest, but sealing them in a bag and using a rolling pin is just as effective and fun. Aim for a mix of fine crumbs and small chunks for varied texture in your Cookies and Cream Dessert Cups.
How do I make Cookies and Cream Dessert Cups vegan?
Swap dairy with vegan cream cheese and coconut whipped cream, and use vegan cookies. I’ve tried this and the results are spot on for Cookies and Cream Dessert Cups—creamy and satisfying.
Can kids help make these?
Definitely! Little ones love crushing cookies and layering, making it a fun family activity. Just supervise the mixing to keep things smooth.
How many calories are in one Cookies and Cream Dessert Cups?
A standard serving has about 280-320 calories, depending on exact portions. They’re indulgent but portion-controlled, so enjoy without guilt.
Final Thoughts
These Cookies and Cream Dessert Cups have become a staple in my dessert rotation because they’re simple, scrumptious, and always hit the spot. From the crunchy base to the dreamy filling, every element comes together for pure bliss. I encourage you to give this recipe a whirl—your taste buds will thank you, and who knows, it might just become your new favorite. Head to the kitchen and start layering; you won’t regret it!